
How to Make Your Blog Posts Stunningly Beautiful with Images
You shouldn’t judge a book by its cover. But that doesn’t stop millions of people from doing exactly that every day.
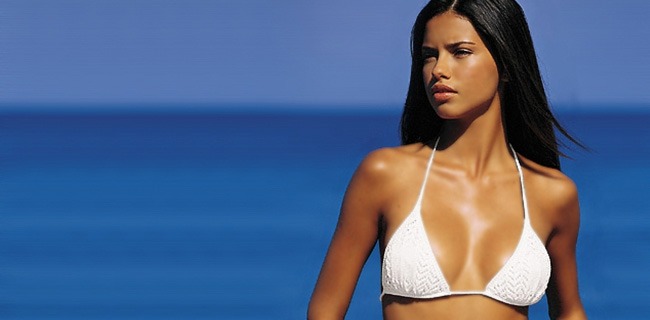
Everyone makes value judgments based on appearances. Unfortunately for me, that means I’ll probably never land a date with Adriana Lima (below).
It also means that simply having well-written articles on your blog isn’t good enough. A good blog post has to look good too — and that means using images to make your blogs stunningly beautiful.
How to Improve Your Blog with Images
(updated February 8th 2021)
How Beautiful Images Benefit a Blog
When you use quality images on your blog, readers associate your blog with that same level of quality. When you use dull or generic images not only will readers not click on your posts, they’ll also assume your content is dull and generic too. So use images that reflect how exciting, interesting, and beautiful you blog is (more on how to find those images below).
These types of high-quality images don’t just improve the perception of your website, but they increase its “stickiness” as well. Visitors are more likely to click on an article when the post image catches their eye or inspires a bit of curiosity.
Good images also help to make your post more likely to be shared on social networks. For instance, when someone shares an article on Facebook they have the option to choose one of the images contained on the page. If you want your content to go viral, you’d better make sure it contains some great images.
The Importance of Putting an Image Above the Fold
On most computer screens, the above image peeks just above the fold when this page loads. That means that every reader is guaranteed to see that there’s an image there — and almost every reader is going to scroll down and see what the image contains. Chances are, those readers are going to read the headline below the picture next… and so on and so on.
Simply convincing your viewers to begin reading and scrolling down is a big hurdle and it’s hugely important. It’s so important, in fact, that Michael asks that every single post on Income Diary have an image above the fold.
Does it work? Well you’ve read this far, haven’t you?
Cropping and Sizing Your Images
The best size image depends on the design of your site, specifically the width of the content area. The ideal size also depends on what works best for the individual image your using. If it’s a simple, iconic image it can afford to be smaller, whereas more intricate images have to be larger in order to view their complexity.
I’ll almost always center these larger images. In this case my favorite size is a big, beautiful 650 x 320 pixels, like the one above. This size is great for making an impact and creating separation between major sections of your article. Don’t use too many of these larger images, though. They’ll slow down the pages loading time and their larger resolution will go to waste on many mobile devices.
Thinner center-oriented images also look great and they can be used more often, like this 650 x 236 pixel image:

For left and right oriented images, I like to keep the width small (example near the bottom). That way you can be sure that it won’t crowd the text too much, even on smaller screens. In this case I’m using a 180 x 180 square image. I orient my images to the left or right very often and that’s partly because they tend to look better in text-heavy writing with long paragraphs, whereas I prefer to write with shorter paragraphs.
On Income Diary, our post images usually range from 345 x 180 pixels to 800 x 350 pixels.
A contrarian view about Image sizing on your blog.
Generally speaking most bloggers want image size to be as small as possible.
While this means faster download times (a good thing for Google) it can also mean the image quality is poor. (Especially when you compress image sizes.)
But what if you wanted to give your visitors a larger image?
Or perhaps you have a small image that you want to increase the size of? (while maintaining quality)
Then you need the Stockphotos AI Image Upscaler service.
The image below was originally 1290×900 pixels but was upscaled to 2560×1920 pixels. Click on image to see full size image.
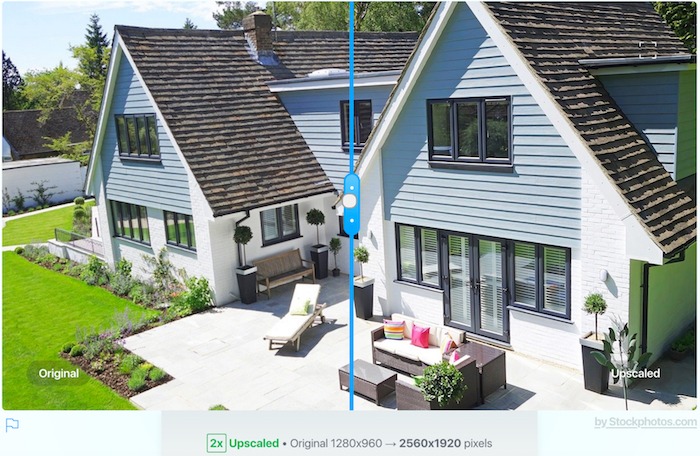
Note: Not only has the image size been increased but the image quality!
This is an excellent tool for those times when you want to give your visitors a high quality large size image. For example in Real Estate, Interior Design etc.
You can try this service out with 3 Free Upscales – and if you like it, buy future upscales from $ 0.10 per upscale.
Where to Get Images to Use in Your Post
There are a lot of different image databases out there, but I recommend Compfight. Compfight is specifically tailored to help bloggers find images for their posts, so its easy to search for images within the creative commons and to attribute images appropriately.
If you can’t find what you’re looking for on Compfight (not bloody likely), then try Flickr or a good old-fashioned Google search.
Making Sure the Image is Licensed for Use on Your Site

Images online are licensed differently, which means that their owners have set different standards for how they can be used by others online. Images on sites like iStock have licenses which require that you pay money in order to use them, but most of the time you can find a great image that suits your needs for absolutely free.
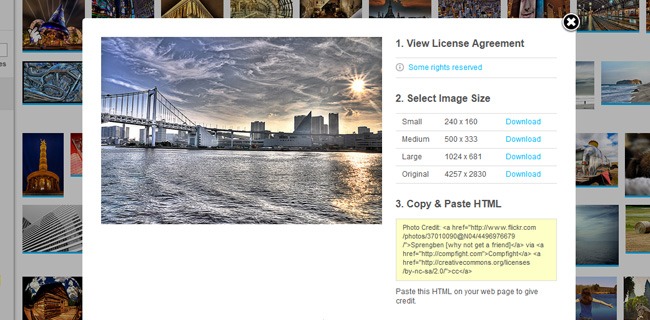
On Compfight, it’s as simple as clicking ‘creative commons’ on the bar to left after you’ve made a search. Once you’ve found an image that you like, you can click on it and view the license agreement. There you’ll see other pertinent information, like whether you’re allowed to remix or adapt the work. I usually only use images that allow me to adapt because that way I can make sure that all of the images in my articles are sized the way I want.
If you’re planning on using an image for commercial purposes, for instance if its included in an ebook that you’re selling or as part of a membership site, then you’ll need to narrow your search further to only images that have a commercial license.
How to Credit the Photographer Online
If you’re using an image that you didn’t create, it’s only fair that you credit the creator for their work.
Again, Compfight makes this very easy. They provide you with a line of html that you can copy and paste directly into your post. Here’s the attribution for the image of Adriana Lima above:
Photo Credit: snobmodels via Compfight cc
Making Your Own Images

“For all of the most important things, the timing always sucks. Waiting for a good time to quit your job? The stars will never align and the traffic lights of life will never all be green at the same time… ‘Someday’ is a disease that will take your dreams to the grave with you.”
– Timothy Ferriss
Creating your own images allows you to create custom images that work perfectly for your article. You also don’t have to add attribution or worry about licensing.If you’re a skilled artist or photographer, then making your own images will come naturally.
I used an original photograph of a stoplight in Bellingham, Washington to illustrate a quote in an article I wrote containing life lessons from Timothy Ferriss. I like when an image has a symbolic connection to the concept that’s being discussed and I also really like this combination of block quote right underneath a big, centered image.
In addition to original photography, I’ve also used my own drawings. The drawing below is for one of my most popular Income Diary posts (21 Life Lessons from Steve Jobs). In this case, it was as simple as taking a pen to paper, scanning the results, and cleaning them up a little bit in Photoshop.
But the most common way that I’ve made my own images is by taking screen shots of web pages (ALT + PrtSc) and editing them. This is on display right here in this article, like the image of the CompFight interface above. In a niche that deals with digital technology like Income Diary, it’s pretty common for a screen capture to be relevant to your article.
Can You Write a Stunningly Beautiful Blog Post?
If so, Income Diary wants to hear from you. We think that we can help our readers more by providing them with more content, more often.
That’s why we’re now accepting submissions for articles and the best part is that we’re actually paying for your work. This is chance to share your expertise with our audience of 10,000’s. Of course, you’re article will have to be informative, well-written, and stunningly beautiful.
You can fill out the submission form here and let me know in the comments below if you have any questions or other good ideas about how to use images in blog posts.
See More Articles Related To Build Better Websites


You said, taking a pic from google search. won’t it create a copyright violation if its copyrighted and the permission to reuse it not given?
btw, a great article. I get to know much..
It really just depends on the image, Ambarish. Some images are public domain and others you can follow back to the original web page and find the licensing information there. Definitely start with Compfight and use Google as a second or third option.
Great post Nick!
I have a question for you: Do you suggest us to put our watermark on our own photos or not? I started to do this, but not sure if readers like it. Thanks!
Many online publishers ignore the licenses of original images and watermarking is an effective way to stop this in its tracks. I don’t think that your readers will mind that you’re protecting your hard work, however a watermark – especially a big or particularly opaque one – is going to make your images less beautiful. You may want to consider only using your watermark on images that you think are particularly likely to be stolen.
nice one. i really learned a lot
Not only should you give credit, but before you even get to that point, if you are using a photo that does not belong to you, ask for permission. Most photographers will give it, but you have to ask.
Nancie, some photographers have essentially given you their permission in advance by giving their images particular licenses. Websites like Compfight make it very clear what photographers intend with the images they put online.
Great post me as i photographer i prefer coming up with my own epic images as much as possible.But its also good to get good photos and credit the rightful owners.Thanks
That’s good, Japheth. But you’re right: sometimes it’s nice to be able to tap into the vast library of images available online. You can’t take every picture for every post!
Good work carry on.
Whenever l came to incomediary…will ended up been inspired!.Nick an articles looking good as this one needed a skillfull writer to master this not what a newbie just come up with..do you mind outline how to master this?..b/c there is more to this than just stunningly beautiful images…
The example photo you used surely sells this post. LOL!
Yep. Definitely stunningly beautiful.
I launched my blog at the end of January. Since, I’ve been roughing it with free stock photos. Thanks a lot for sharing ideas and resources to help me spice up my posts! 🙂
Yeah, stock photos can be great but it’s nice to have some variety. Good luck with your new blog!
Thank you nick. Very well defined article. It is really helpful for image creation, and placement. It is actually a great way to get your audiance. Regards. Umar
This is cool Nick,
Pictures tell a thousand words.
Still not sure what a picture of a thousand words tells.
Great tips for adding photos to a blog. When we think about SEO we always tend to get caught up worrying about optimising for search engine robots when we should be thinking about optimising for people too. Adding photos definitely makes your blog more user friendly.
This is exactly what I am looking for as I start my new website. Thank you Nick!
As a general rule I try to include at least one image in each of my articles but in practice many of my articles have several images, particularly lists. One technique I find very useful is the save for web feature in Photoshop. I also slide the quality down to about 50% for Jpegs and reduce the number of colours for GIF’s. This is easy and means that my graphics are atleats 4 times smaller in file size.